Gluten Free Dosa
Gluten free dosa is one of the healthiest breakfast recipes — and it doesn’t hurt that it’s so scrumptious, too! The crêpe-like food is made from fermented rice and lentils. The smooth batter is spread across a traditional griddle (tawa) and cooked on one side until golden brown, crispy, and slightly fluffy. It has a distinctive sour flavour that pairs perfectly with traditional accompaniments: vegetable sambar, coconut chutney, and kara chutney, to name but a few.

Because gluten free dosa is fermented, it’s full of healthy nutrients that promote gut health. It’s also 100% vegan, nut free, and soy free, making the dish so accessible.
Dosa originates from South India — a cuisine vastly distinct from the creamy, rich dishes of the North. Here, households cook the meal religiously on an almost daily basis, along with other items made from a very similar batter, such as medu vada, uttapam, and fluffy idlis.
In big metropolitan centres like Bangalore, Chennai, and Mumbai, street food stalls have made many variations of the traditional dosa. But still, I always return to a classic gluten free dosa: gloriously sour, crisp, and slightly nutty. This recipe is all those things and more — everything you need to make the best dosa you’ve ever tasted, to rival restaurants and street stalls alike.

🥞 Gluten Free Dosa Ingredients
You’ll only need 5 ingredients for this easy gluten free dosa recipe — and that includes salt! However, selecting the right ingredients is the ultimate key to success.
- Rice is the primary ingredient for gluten free dosa. It’s vital to use the right sort of rice, as it affects your dosa batter’s taste and texture. So, what is the best rice for dosa? Use short-grain, raw rice such as sona masoori or idli rice (no basmati, please!).
- Urad dal is the second component of gluten free dosa batter. You can read more about urad dal in my guide to lentils, beans, and pulses — but it’s important to use split urad dal. This adds fluffiness to the batter.
- Fenugreek seeds aid in the fermentation of the dosa batter and provide a natural nutty tanginess.
- Poha (flattened/beaten rice) is optional but helps make the gluten free dosa irresistibly crispy.
- Salt is essential for flavor, but must only be added after fermentation.


🧑🍳 How to Make Gluten Free Dosa
If you didn’t grow up in South Indian culture, making dosa is intimidating. Ask anyone and they’ll say it’s too complex. “Buy premade dosa mix,” they’ll suggest (don’t!). Some people claim you need a wet grinder (you don’t, although a good Indian mixer-grinder is essential). It seems like too much information, and too many ways for everything to go wrong.
I’m here to tell you that making dosa is achievable. Since it involves fermentation, it’s not a quick process. But it can be broken down into manageable steps, and if you have the right ingredients and the right cookware, it’s not difficult.
So, don’t buy the premade dosa mix — this gluten free dosa recipe is all you need.
- In two separate bowls, soak the rice and fenugreek seeds, and split urad dal overnight.
- The next morning, drain the water. To a large mixer grinder, add the urad dal along with fresh water. Grind to a smooth batter. Transform to a large bowl.
- Next, add the rice fenugreek seeds, and poha to the mixer grinder. Add fresh water and grind the rice to a paste. This will be slightly grainy; that’s expected. Transfer the paste to the same large bowl as the split urad dal paste.
- Use your hands to mix the two batters.
- Cover the bowl and place in the dark. Leave the batter to ferment. This can take anywhere from 8 – 18 hrs, depending on the weather (heat + humidity).
- Once fermented, add salt and water to adjust the consistency.
- Heat a large cast iron tawa on medium heat and wait for it to steam. Sprinkle cold water, then pour the gluten free dosa batter in the middle of the tawa. Using a ladle, quickly and carefully spread it around the tawa in a circular motion.
- Drizzle with oil and leave the dosa to cook until it starts to leave the sides of the pan and becomes brown.
More detailed instructions can be found in the recipe card below.

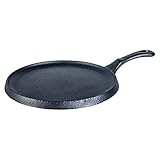

What is the Best Pan for Dosa?
The pan you use to make gluten free dosa makes a HUGE difference. Don’t attempt to cook dosa in a non-stick frying pan, for example.
Invest in a large cast iron tawa for the best results.
A tawa is an indispensable piece in an Indian cookware collection. It’s used to make chapatis, garlic coriander naan, parathas, and even curries. However, while a chapati tawa is quite small, a dosa tawa is much larger.
Additionally, while most chapati tawa brands are made from aluminium or non-stick, cast iron is the best material for a dosa tawa as it conducts heat so well. This will result in a mouth-wateringly even golden brown colour and a crisp texture you simply can’t get from another material.
Your local Indian store should stock a cast iron dosa tawa, but if not, you can find my recommendation of the best pan for dosa in the Amazon links above.

💡Expert Tips for Gluten Free Dosa
I’ve been cooking Indian food for over a decade, and in that time I’ve had my fair share of fails. That is to say, I’ve made all the mistakes so I can save you from making the same errors! Plus, I’ve been privy to invaluable advice from Indian family.
Here are all the things you should know before you grab your apron and start cooking.
First, let’s start with tips to make the best dosa batter:
- Wash the rice and lentils before you soak or ferment them. Seriously, it makes a difference. Washing your rice and lentils before cooking is good practice anyway, but here, it’s all-important — the batter can go rancid if you don’t.
- Use fresh water when you grind the rice and lentils. Again, the batter can be negatively affected if you don’t, especially in hot weather.
- I’ve tried the ratio of both 3:1 and 4:1 rice to dal, and despite hearing that 4:1 makes a crispier batter, I’ve had far more consistent results with a 3:1 ratio, so stick to the recipe!
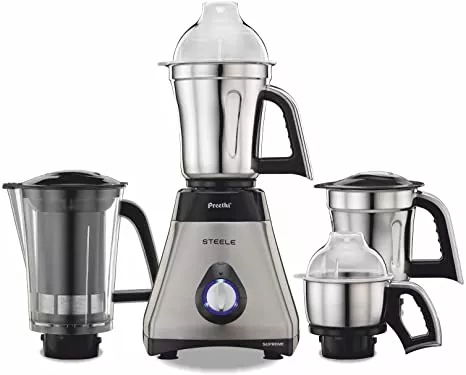
- Grind the rice and dal separately for the best results.
- Use a good mixer grinder, preferably one designed for Indian food. I’ve used a Western blender for dosa batter previously and investing in an Indian brand (Prestige or Preethi) has made ALL the difference. A wet grinder is the most traditional, but expensive in the West.
- After grinding, mix the dosa batter with your hands. Traditional home cooks tell me the warmth from your hands helps to aid fermentation!
- Use a big enough bowl to ferment your batter, as the batter expands and becomes fluffy, taking up more space.
- The fermentation time can vary depending on the season. In summer, fermentation happens faster, whereas, in contrast, it takes much longer in winter. Plan accordingly.
- Season your batter with salt only AFTER you’ve fermented it. Salt can slow or completely stop the fermentation process.
Advice for Cooking the Best Dosa:
- Use a well-seasoned cast iron pan for the crispiest dosa.
- Heat your pan until steaming and then lower the temperature with a splash of cold water.
- Use the back of a ladle or a flat vati to spread the batter, rather than attempting to spread gluten free dosa batter like a crêpe (it won’t work!).
- Only drizzle with oil once the dosa is on the tawa, not beforehand.
- Wipe your cast iron tawa with a piece of tissue each time after cooking a dosa.
Of course, while this recipe makes a basic gluten free dosa, you can adapt it to make loads of fun variations! Stuff the dosa with a spiced potato masala mixture to make masala dosa, stir-fried paneer for paneer masala dosa, or even grated vegetables for jini dosa.
✨ This Gluten Free Dosa Recipe Is …
Gluten Free Dosa
Gluten free dosa is made from fermented rice and lentil batter cooked until crisp, golden brown, and tangy.
Ingredients
- 420g Sona Masoori or Idli Rice
- 140g Split Urad Dal
- 1 tbsp Poha, optional
- 1/2 tsp Fenugreek Seeds, optional
- 150ml (10 tbsp) Cold Water, to grind the rice
- 150ml (10 tbsp) Cold Water, to grind the split urad dal
- Neutral Oil (to cook the dosa)
Instructions
To ferment the dosa batter:
- In separate bowls, wash the rice and split urad dal until the water runs clear.
- Soak the rice and dal. In one bowl, add the rice and fenugreek seeds with plenty of fresh water. In the other, add the split urad dal, again with plenty of fresh water. Leave to soak overnight, or around 8 hrs.
- Grind the urad dal. The next morning, drain the old water. To a large mixer grinder, add the drained urad dal along with the specified quantity of fresh water. Grind in pulses until you achieve a smooth batter, and transfer to a very large bowl.
- Grind the rice. Drain excess water from the rice and fenugreek seeds. Add them to the same mixer grinder along with the poha. Grind to a smooth (slightly grainy is normal) paste. Transfer the paste to the same large bowl as the dal.
- Mix the batter. Using your clean hands, mix the two batters until incorporated.
- Leave the gluten free dosa batter to ferment. Cover the bowl with a plate and place it in a dark location (or cover with towels). Leave it to ferment for at least 8 hrs. You can tell the batter is fermented as it rises, becomes fluffy, and develops a sour smell. See the pictures in the post above for reference.
To Cook the Dosa Batter
- Season and adjust the consistency of your batter. Once fermented, add sea salt to the batter and mix well. Then add water to loosen the consistency to a thick yet flowing paste. Don't make it too thin or too thick, as it will make the dosa hard to spread!*
- Heat the tawa. Over your largest stovetop ring, heat your cast iron tawa over a medium flame. Once it steams, sprinkle cold water over the tawa — it should "dance" and begin to evaporate.
- Spread the dosa batter. Use a large metal ladle, take a ladleful of batter, and drop it in the middle of the tawa. Quickly and carefully make circular motions with the rounded back of your ladle, working outwards, to create the dosa shape.
- Cook the gluten free dosa. Drizzle the top of the dosa with oil and leave it to cook until you can see the bottom color change to golden brown, and the edges leave the side of the pan. Once this happens, use a metal utensil to take the dosa from the pan. No need to cook the other side!
- Repeat.
Notes
*I haven't given exact measurements for the quantity of water to add as it depends on the state of fermentation.
Recommended Products
As an Amazon Associate and member of other affiliate programs, I earn from qualifying purchases.


Nutrition Information:
Yield: 14 Serving Size: 1Amount Per Serving: Calories: 111Total Fat: 2gSaturated Fat: 0gTrans Fat: 0gUnsaturated Fat: 2gCholesterol: 0mgSodium: 111mgCarbohydrates: 20gFiber: 2gSugar: 1gProtein: 4g
Nutrition information isn’t always accurate.