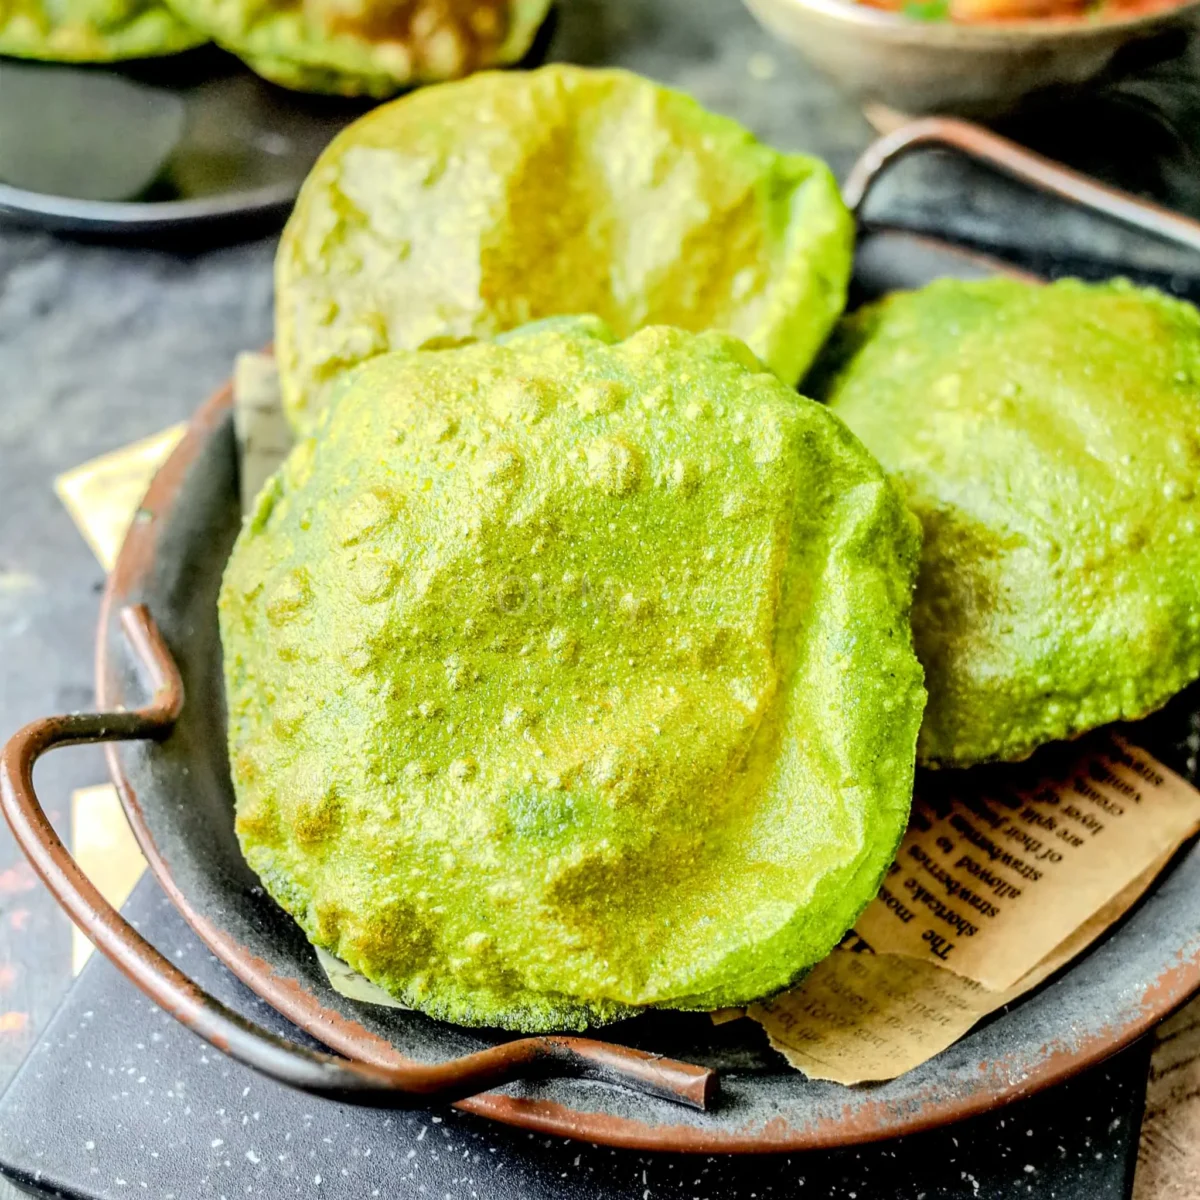
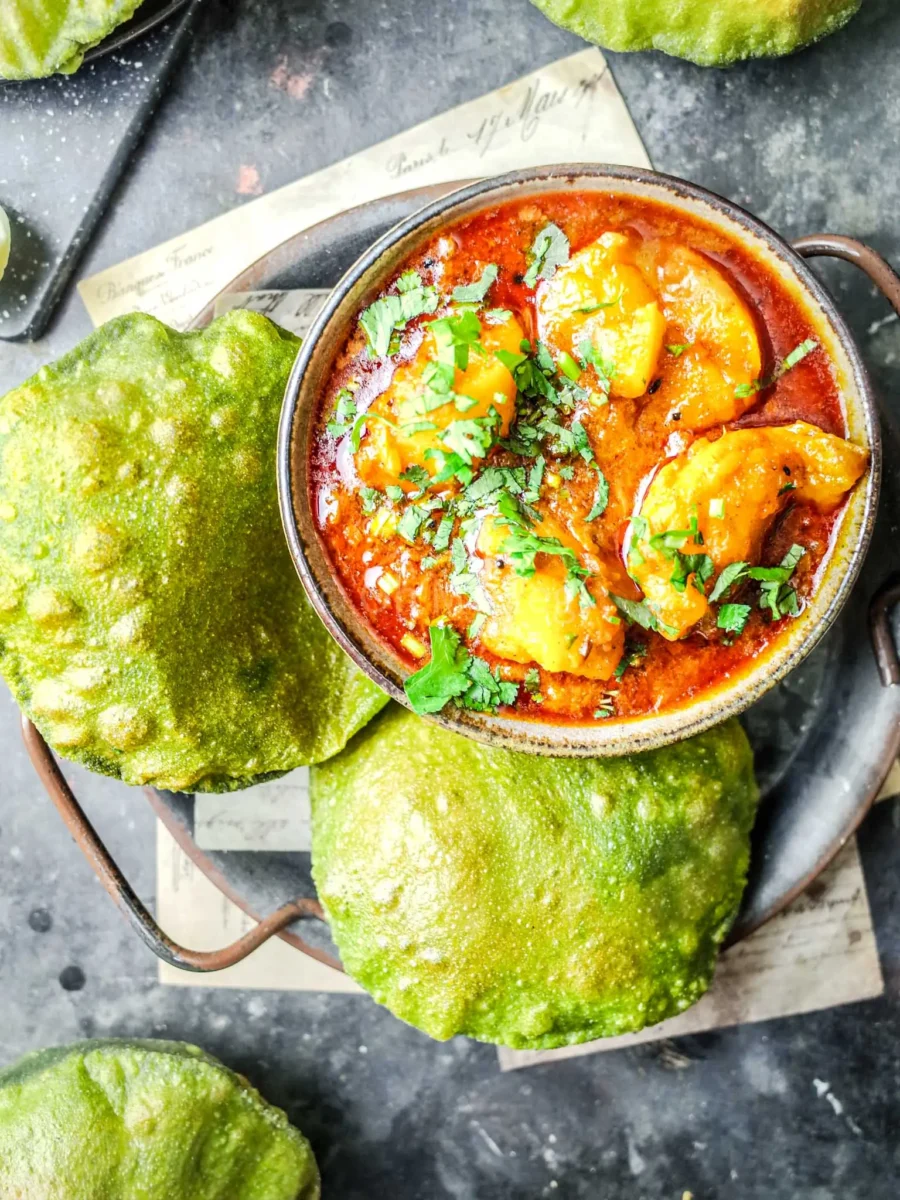
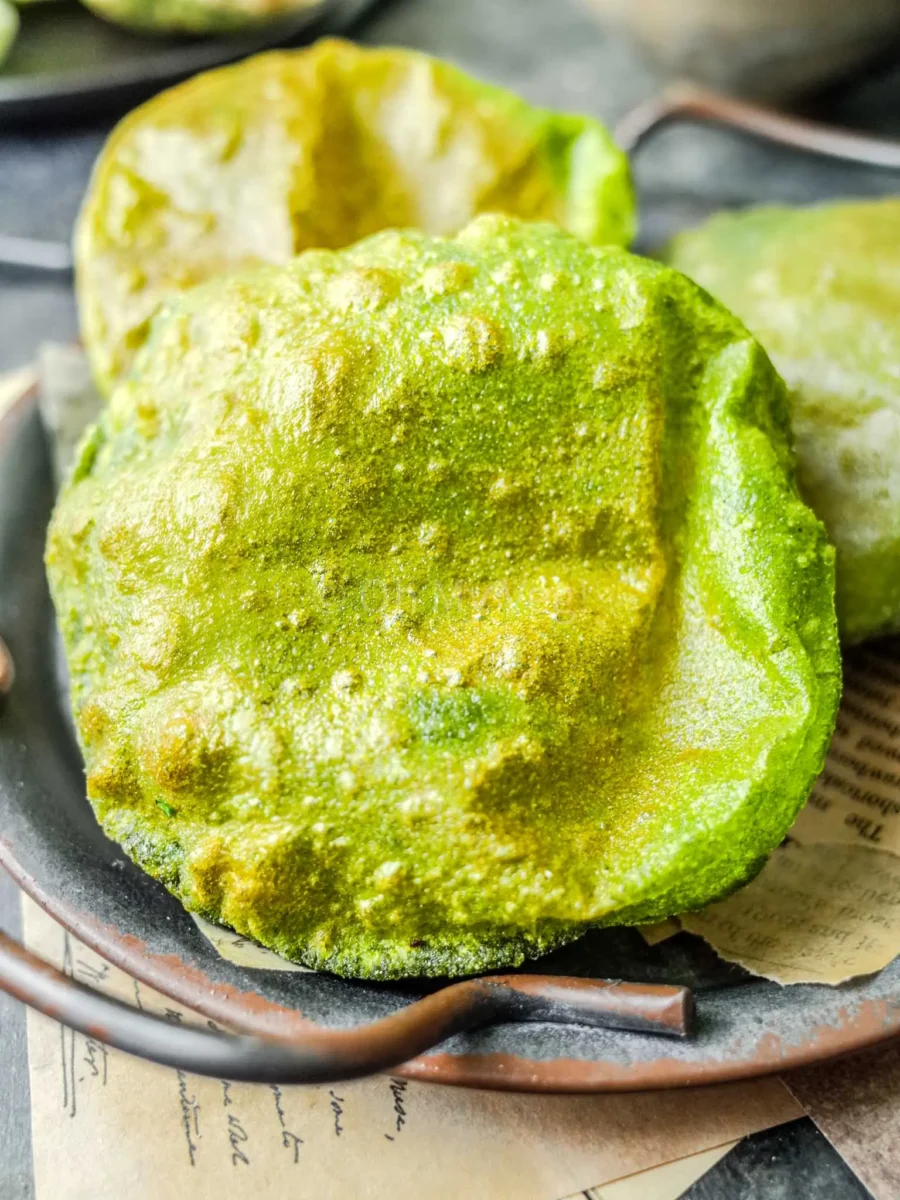
Palak Puri (That Puffs Every Time)
Indian breads are so much more than a basic (don’t get me wrong, delicious) naan. Meet palak puri: delicate, perfectly crisp texture that balloons beautifully when fried in hot oil, with a robust, vibrant flavour that’ll elevate any curry.
If you called me a breadacholic, you’d be right. On any given day, I’ll be tucking into roti (chapati), puri, parotta — even naan, bhatura, or palak paneer paratha on special occasions. By far the best way to soak up all the unctuous, fiery flavours of curries is with fresh, homemade bread.
I’m not sure why it’s taken me so many years to photograph and post this palak puri recipe! There was a giant palak puri-shaped hole in my recipe index, but thankfully, it’s officially been filled 😆. Palak puri is one of the first Indian breads I learnt to cook, and it instantly became a staple of my kitchen. I’ve made it countless times since.
In fact, I rarely serve favourites like batatyacha rassa (Maharashtrian potato curry) or chana masala without a side of puffy palak puri.
They bring much more to the table than a standard plain flatbread. There’s the stunning green colour that makes palak puri so appetising, yes, but there’s also flavour and nutrition.
I’m talking robust, subtle earthiness from spinach. Sharp and fruity heat from green chillies. Garlicky backbone from a pinch of asafoetida. All packaged in a deep-fried bread that puffs just like a balloon: hollow in the centre, shatteringly crisp exterior (that’s somehow also soft!), and light.
Beware — it’s dangerously easy to eat 10 at a time!
Making palak puri from scratch can be intimidating (especially for people new to cooking Indian cuisine or making fresh bread), but it doesn’t have to be.
I’ll teach you how to make palak puri successfully every single time. In this post, you’ll find a combination of step-by-step photos, useful tips, and expert experience. Chalo!
❤️ Why You’ll Love This Recipe
🍃 Ingredient Notes
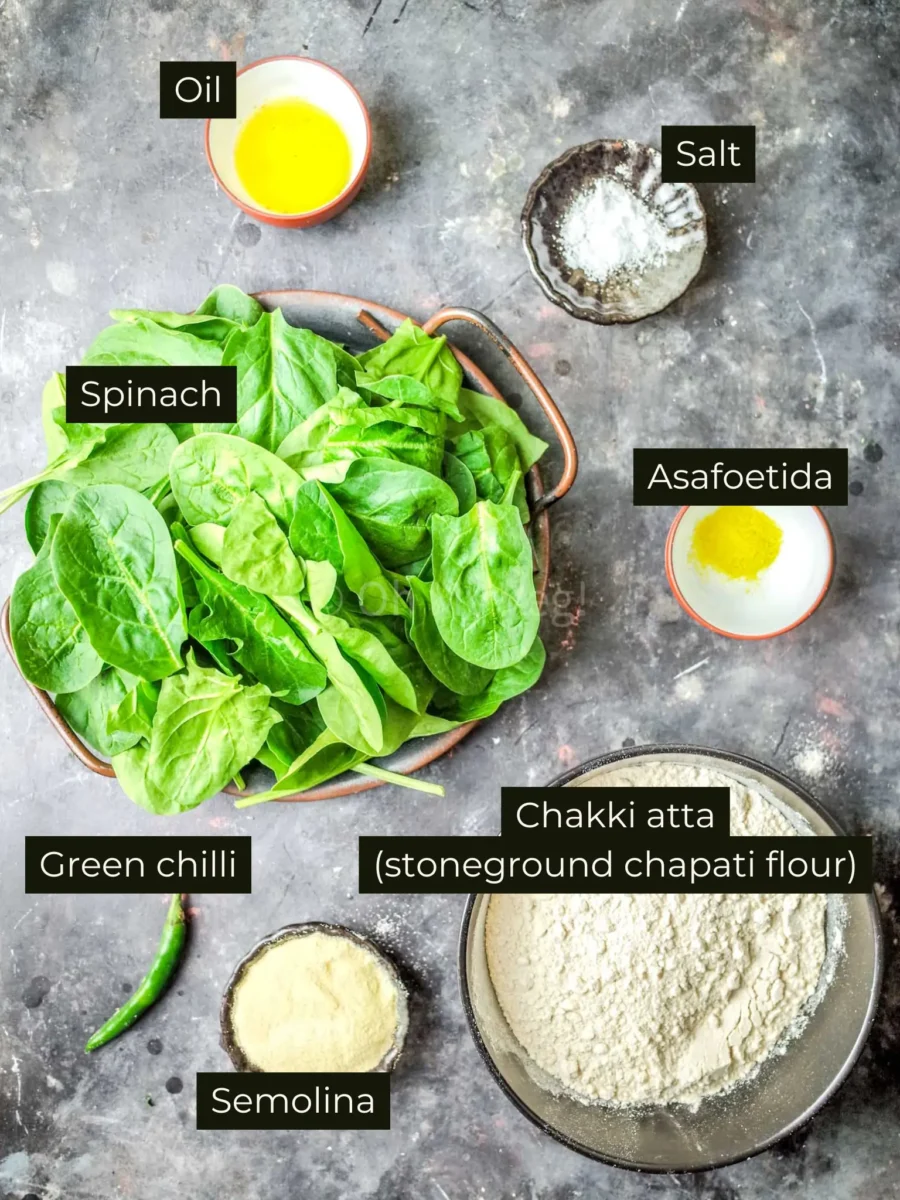
Technically, you only need 4 ingredients for palak puri: flour, semolina, spinach, and oil (for deep-frying). However, a few extra spices seriously upgrade the dish to a whole new level, so I highly recommend seeking them out!
- Stoneground chapati flour is the core ingredient for palak puri. It’s also called chakki atta, and is a must. Find it in the world foods section of your local grocery store or head to a specialist Indian market.
- Semolina gives the puri a little extra crispiness. It’s also used in Indian desserts like sheera, not to mention rava idli — great to keep in the pantry.
- Spinach brings colour, nutrition, and flavour. I use baby spinach leaves, which are milder than the more mature leaf.
- Green chilli adds a sharp, fruity heat. I like to use Indian jwala chillies, but any thin, spicy green chilli will do.
- Asafoetida (hing) is a spice with a distinctive garlicky, allium-like flavour. Spinach and garlic are a match made in heaven (just ask lasooni palak paneer!), so it’s no surprise the combination works in this palak puri. Just a pinch is enough!
- Fine sea salt … because everyone should be seasoning their food!
- Oil is used twice in this recipe. First, we add a little in the dough, to make it malleable — it also makes the puris crispier, while retaining that soft inside. Secondly, we’ll use neutral oil (sunflower, rapeseed [canola], vegetable, or peanut) for deep-frying the palak puri.
What is Chakki Atta?
New to making Indian flatbreads? Chakki atta is going to be your new best friend: I use it to make chapati, paratha, and puri dough — among other things.
Translated from Hindi, chakki atta means “stone-ground flour.”
Chakki is the Hindi name for a rustic, traditional stone mill that’s operated by hand, and the secret to why this flour is incredibly fine-milled!
While chakki atta is a variety of wholemeal flour — it’s made with whole wheat kernels — typical wholemeal flour isn’t a substitute. The latter is coarse and earthy, while traditional stone milling renders chakki atta into a fine, soft flour.
Where to Buy Chakki Atta
If you’re based in the U.K., you can find chakki atta in the World Food section of most major supermarkets. For a better choice of brands and pack sizes, head to your local Indian store or check out online retailers such as Amazon.
When buying chakki atta, check the packaging for labels that say “chakki atta,” and “100% whole wheat.”
Although it’s cheaper, I don’t recommend buying ‘medium’ chapati flour. Because the flour is coarser, it’s harder to work with and results in harder chapatis (or, in this case, puris).
Which Brand of Chakki Atta is Best?
In the 10+ years I’ve been cooking Indian food, I’ve tested all the major brands of chakki atta.
I’ve come to one conclusion: I like Aashirvaad Shubh Chakki Atta best. It’s a dream to work with.
Because I cook Indian food daily, I buy Aashirvaad in 10kg bulk bags to save money. It’s also available in 5kg and 2kg bags, for those of you who will use it less regularly.
Substituting Ingredients: Can I use Plain Flour/AP Flour?
Please don’t use plain flour (all-purpose flour/maida) to make palak puri.
There are a few reasons why. Firstly, the dough behaves very differently due to differing protein and wheat levels. Puri made with plain flour is very elastic and hard to work with.
Secondly, chakki atta absorbs more water, so you’d need to adjust the recipe ratios substantially.
Thirdly, and perhaps most importantly, the taste is vastly different.
Traditionally, we make a similar bread, Bengali luchi, with plain/AP flour (maida). If you’d like to bake with plain flour, I recommend that recipe.
Adapting for Allergies and Dietary Requirements
Palak puri is 100% vegan, dairy-free, soy-free, and nut-free. That makes them a great choice for serving to groups.
To make palak puri gluten-free, use gluten-free chakki atta. I haven’t tried this myself, so it may be worth getting a variety box (Eurostar sells a selection of brown, medium brown, and white gluten-free chapati flour). Anticipate having to adjust water ratios slightly.
🧑🍳 How to Make Palak Puri: Step-by-Step Photos
Making palak puri is a multi-step process: blend the spinach, make the dough, roll out the puri, and fry the puri.
Unlike many other recipes, I don’t overcomplicate matters by blanching the spinach. During my extensive recipe testing, I noticed that skipping blanching saves time and has no effect on the visual vibrancy or flavour.
Follow along with these step-by-step photos (taken right in my working kitchen):
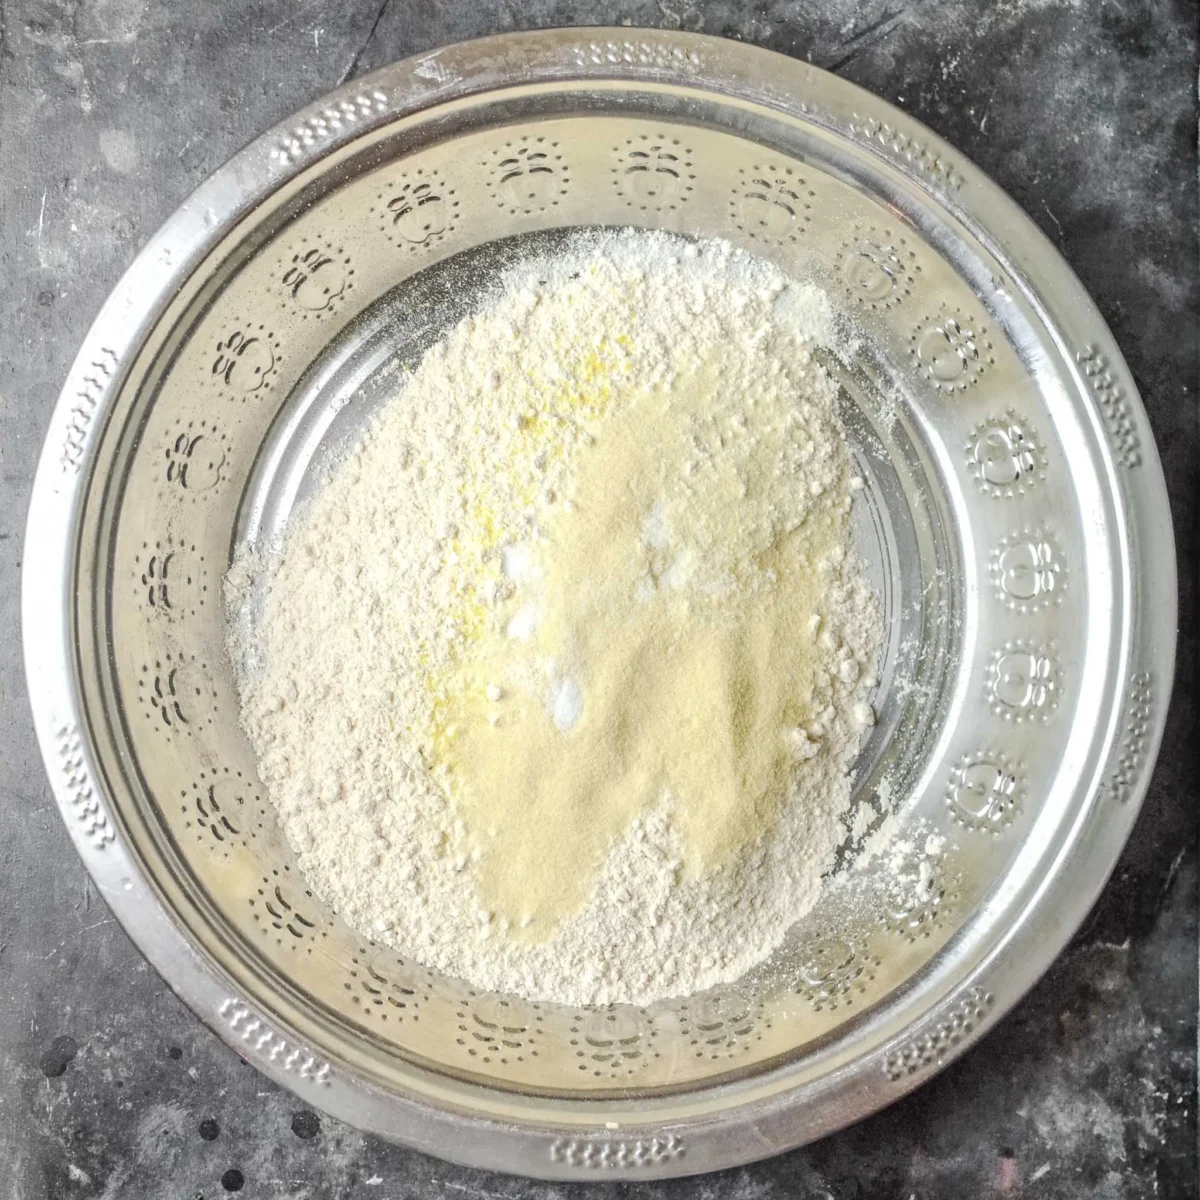
One: In a large parat or mixing bowl, add your stone-ground chapati flour, semolina, asafoetida, and salt. Mix to integrate.
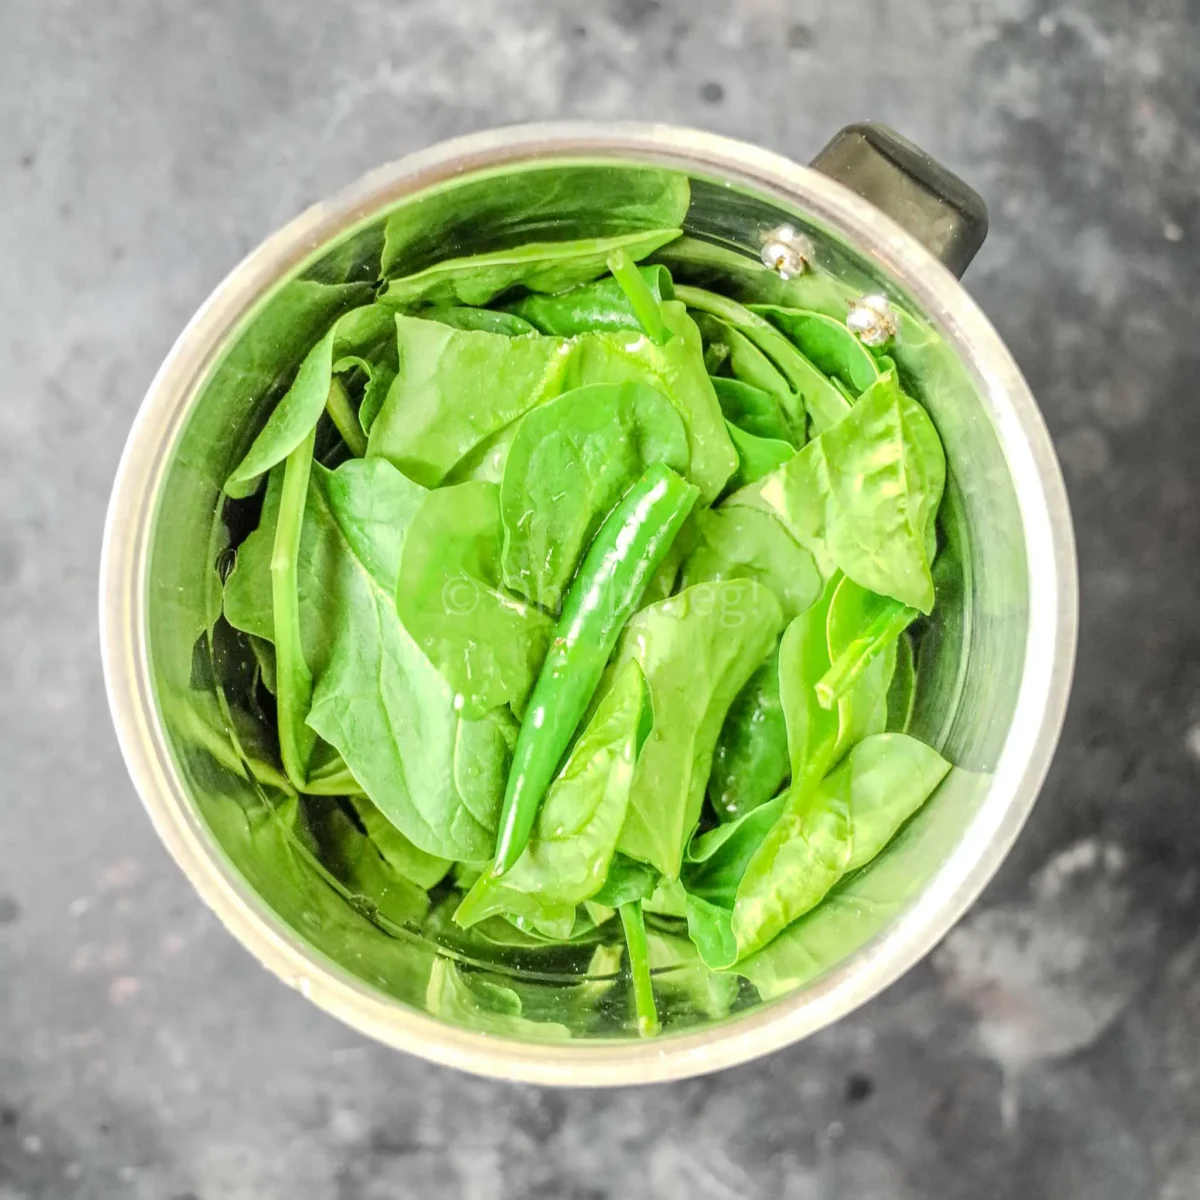
Two: Add washed spinach leaves, a de-stemmed green chilli, and 50ml water to a blender.
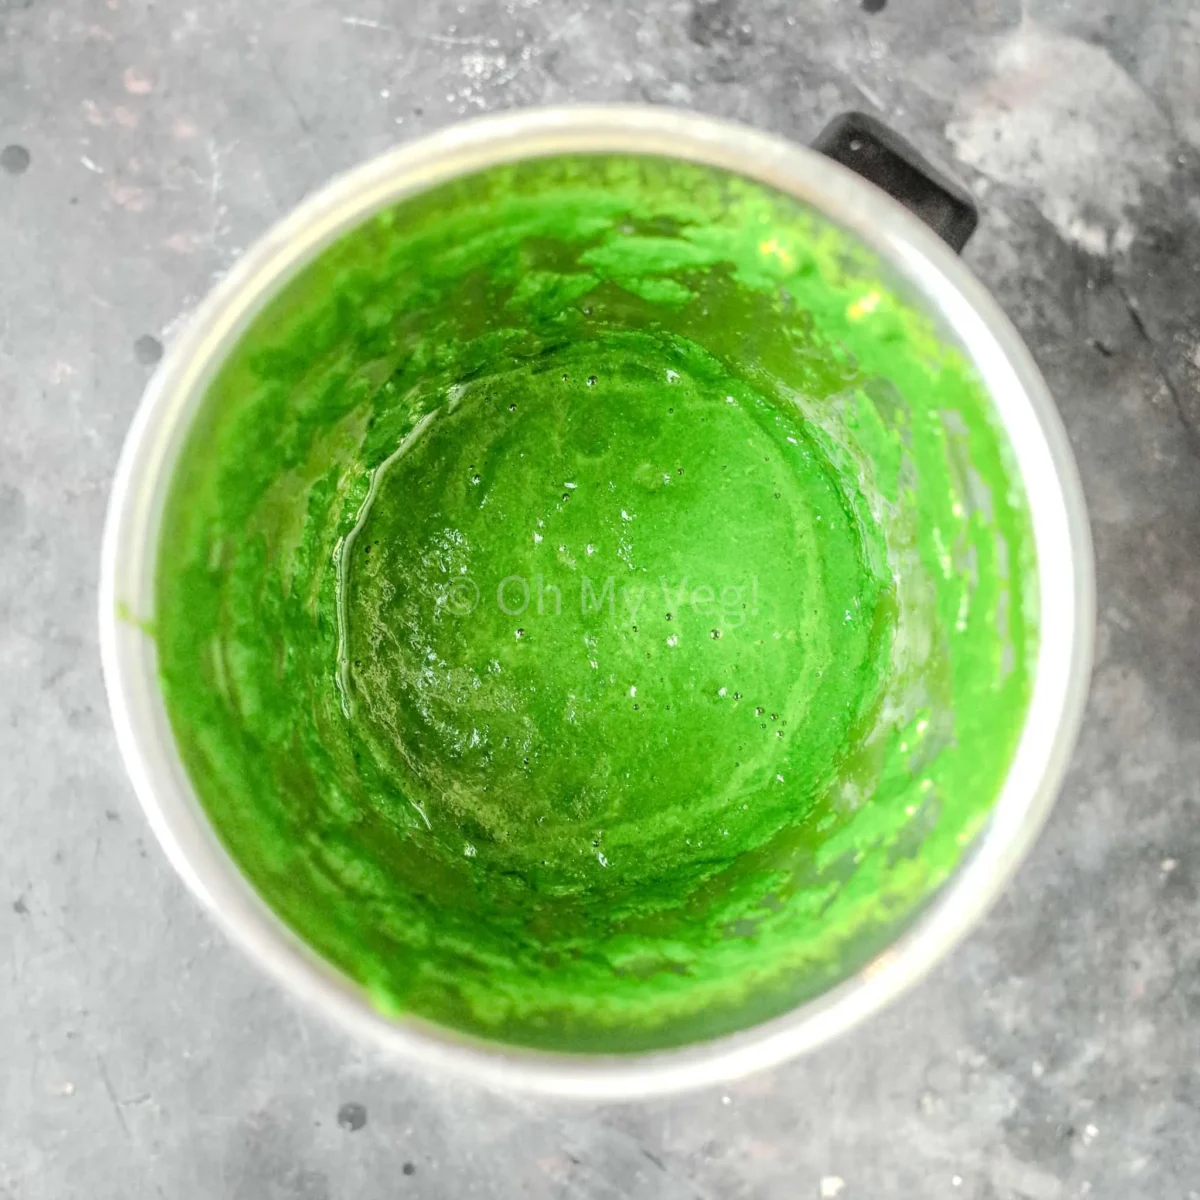
Three: Blend the mixture to a smooth, vibrant, thin paste.
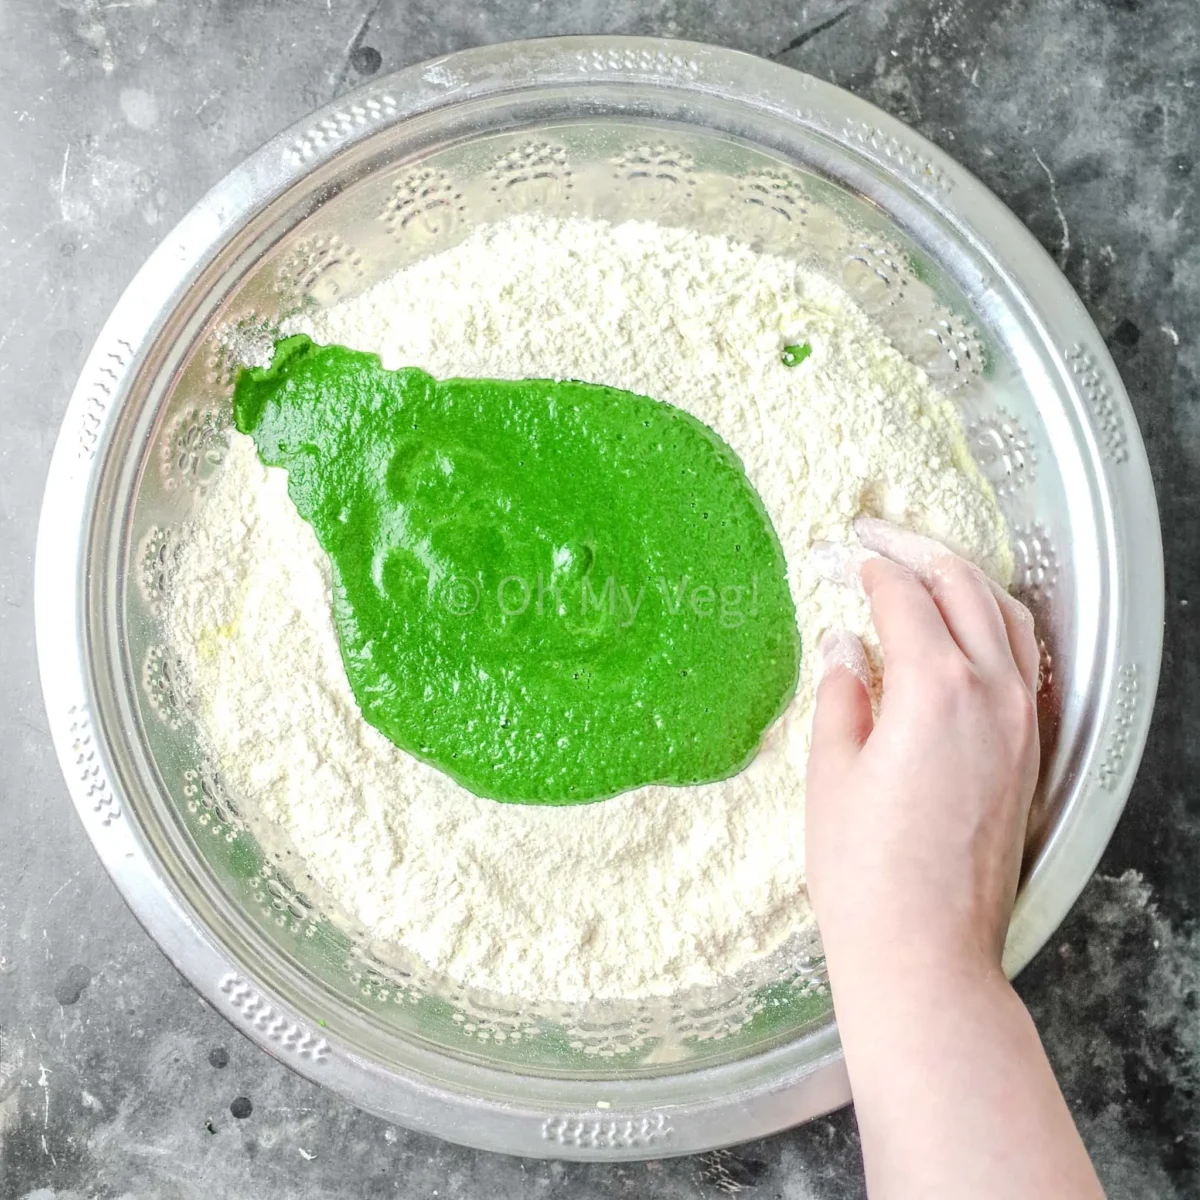
Four: Pour the spinach mixture into your mixing bowl.
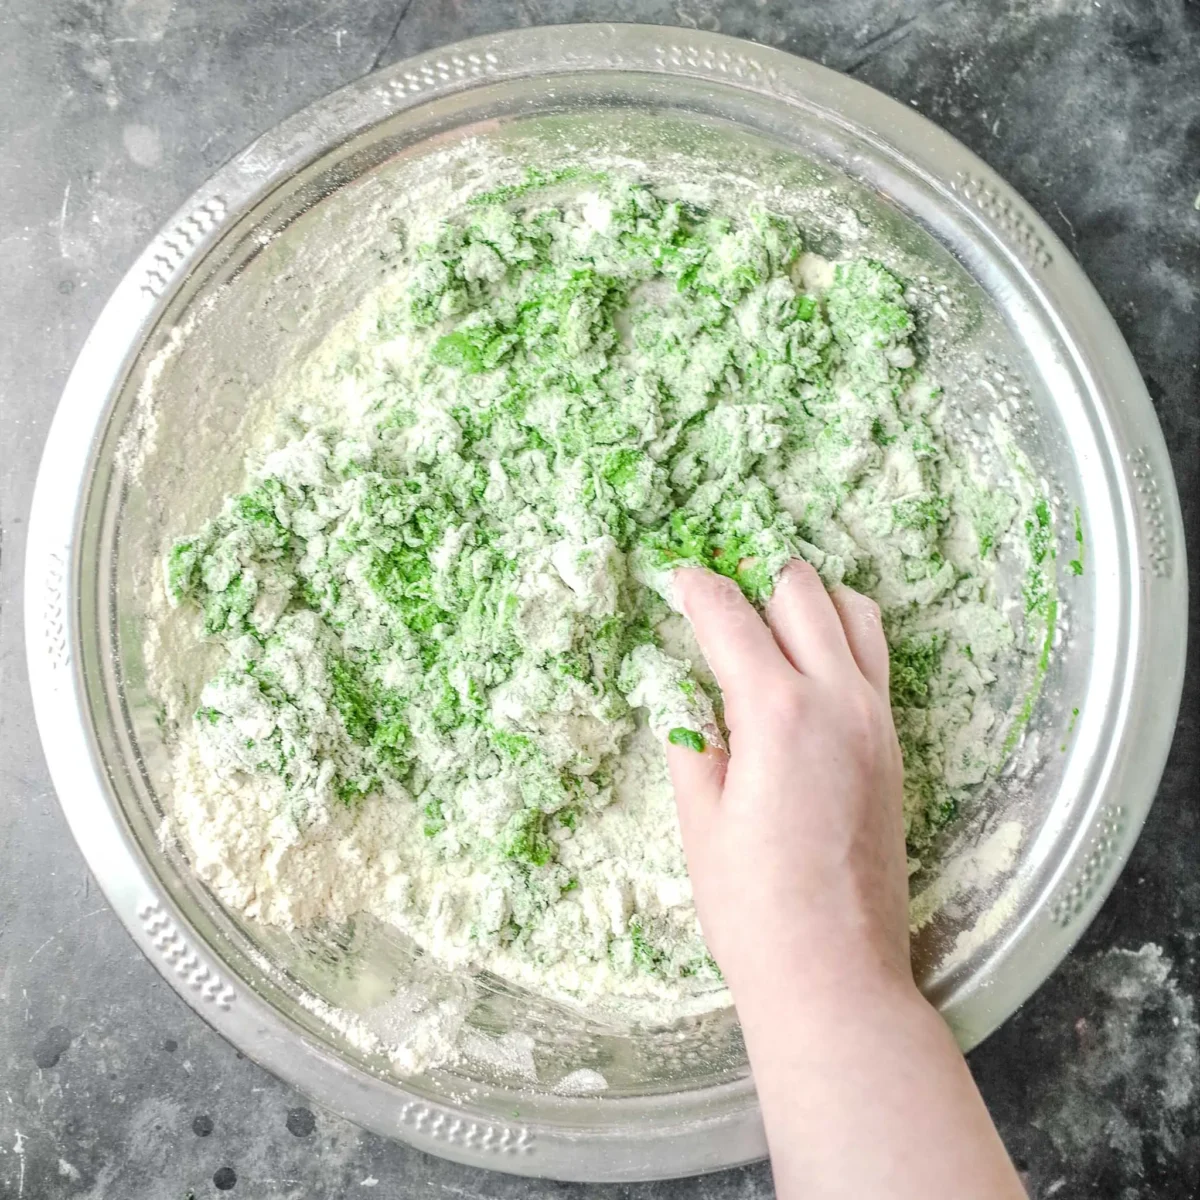
Five: Slowly start to incorporate the dry ingredients into the wet.
Six: When the wet and dry are fully incorporated, start kneading: form a ball and begin pushing down on the dough with the heel of your hand (between the palm and wrist). Knead for 2-5 minutes.
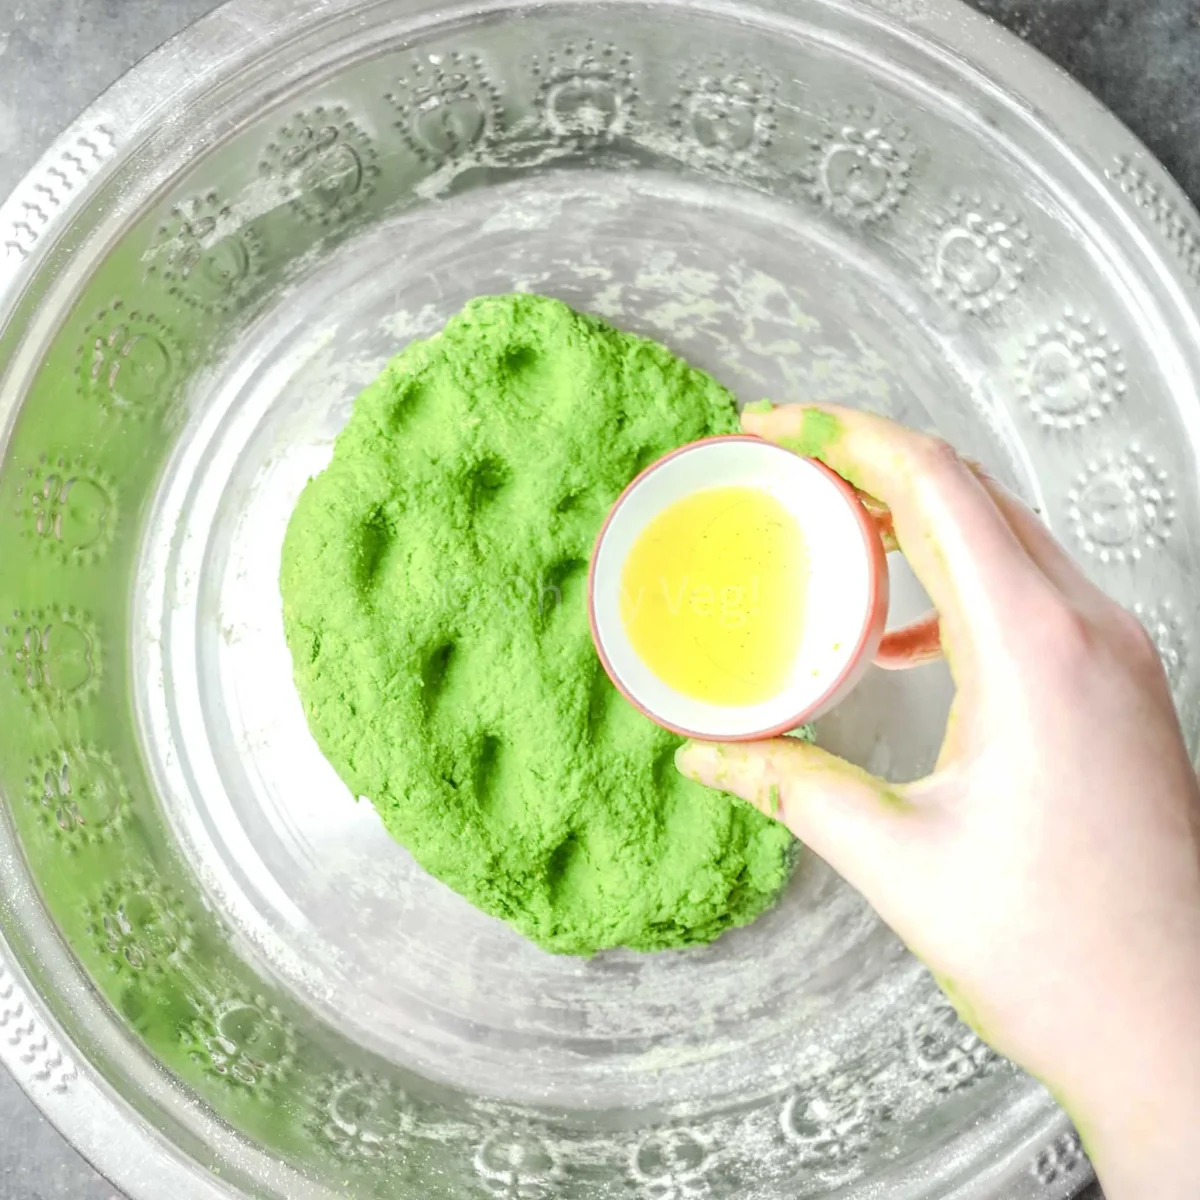
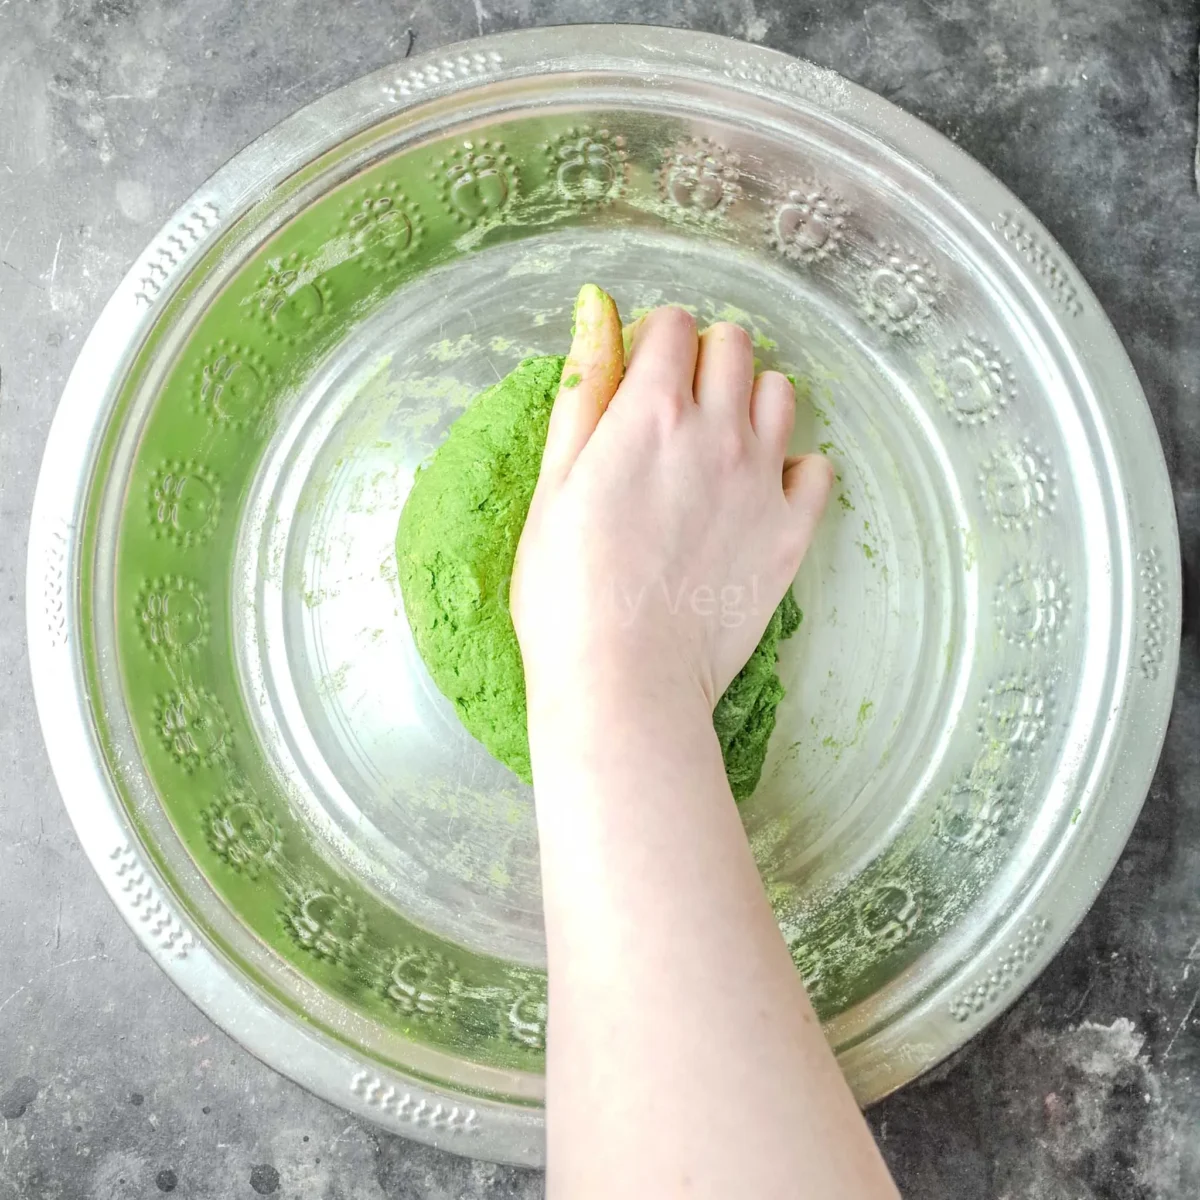
Seven: Flatten the dough. Make indents with your fingers, then add oil. Knead the oil into the dough.
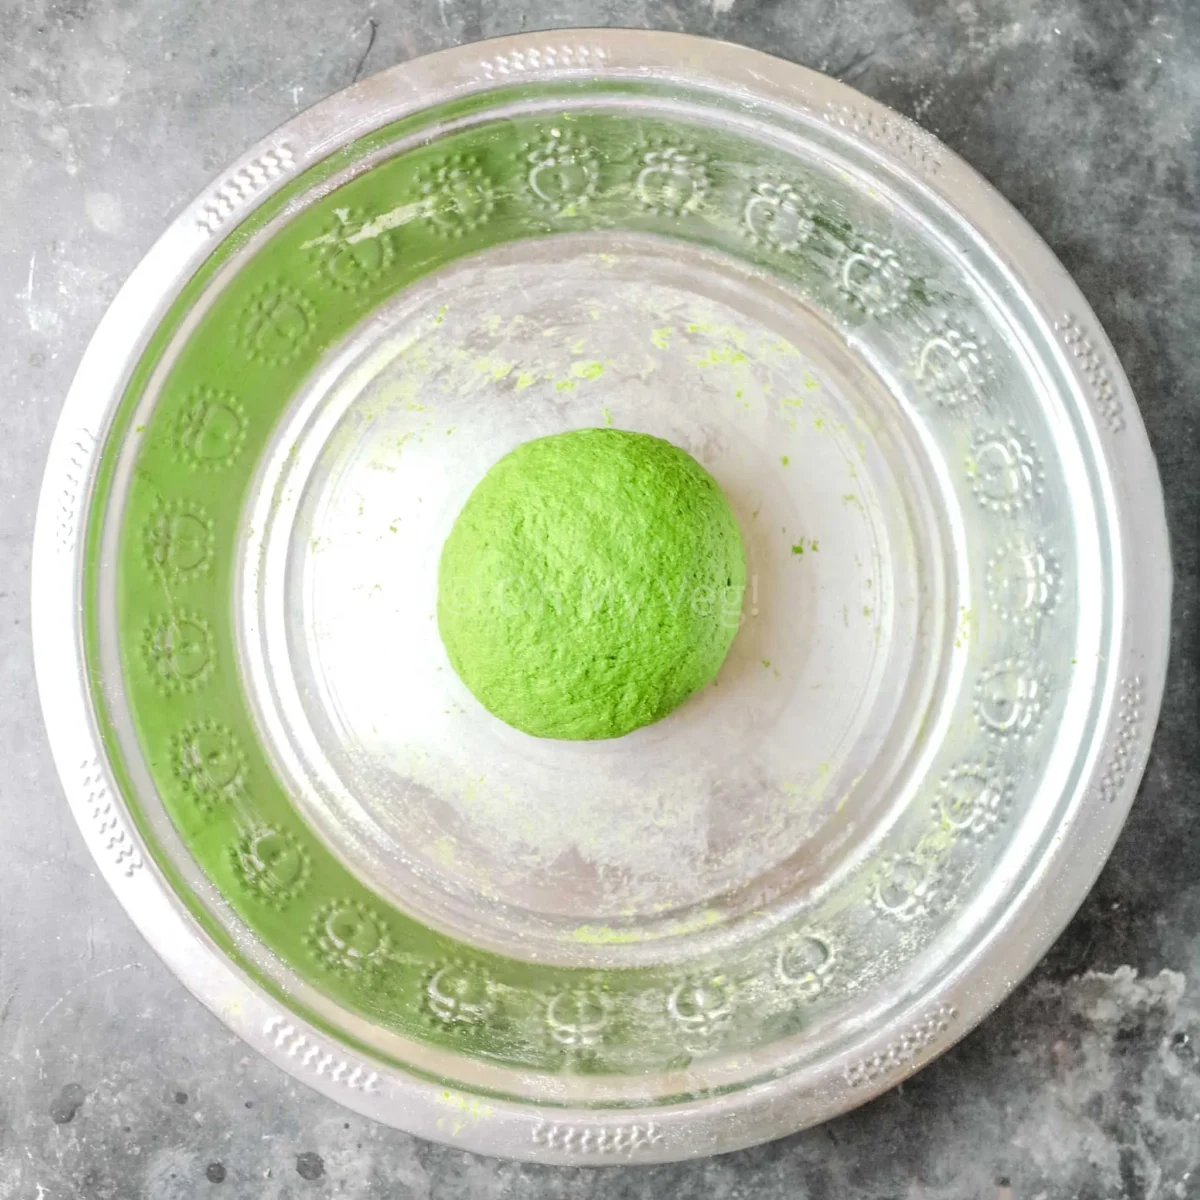
Eight: Roll the dough into a smooth ball.
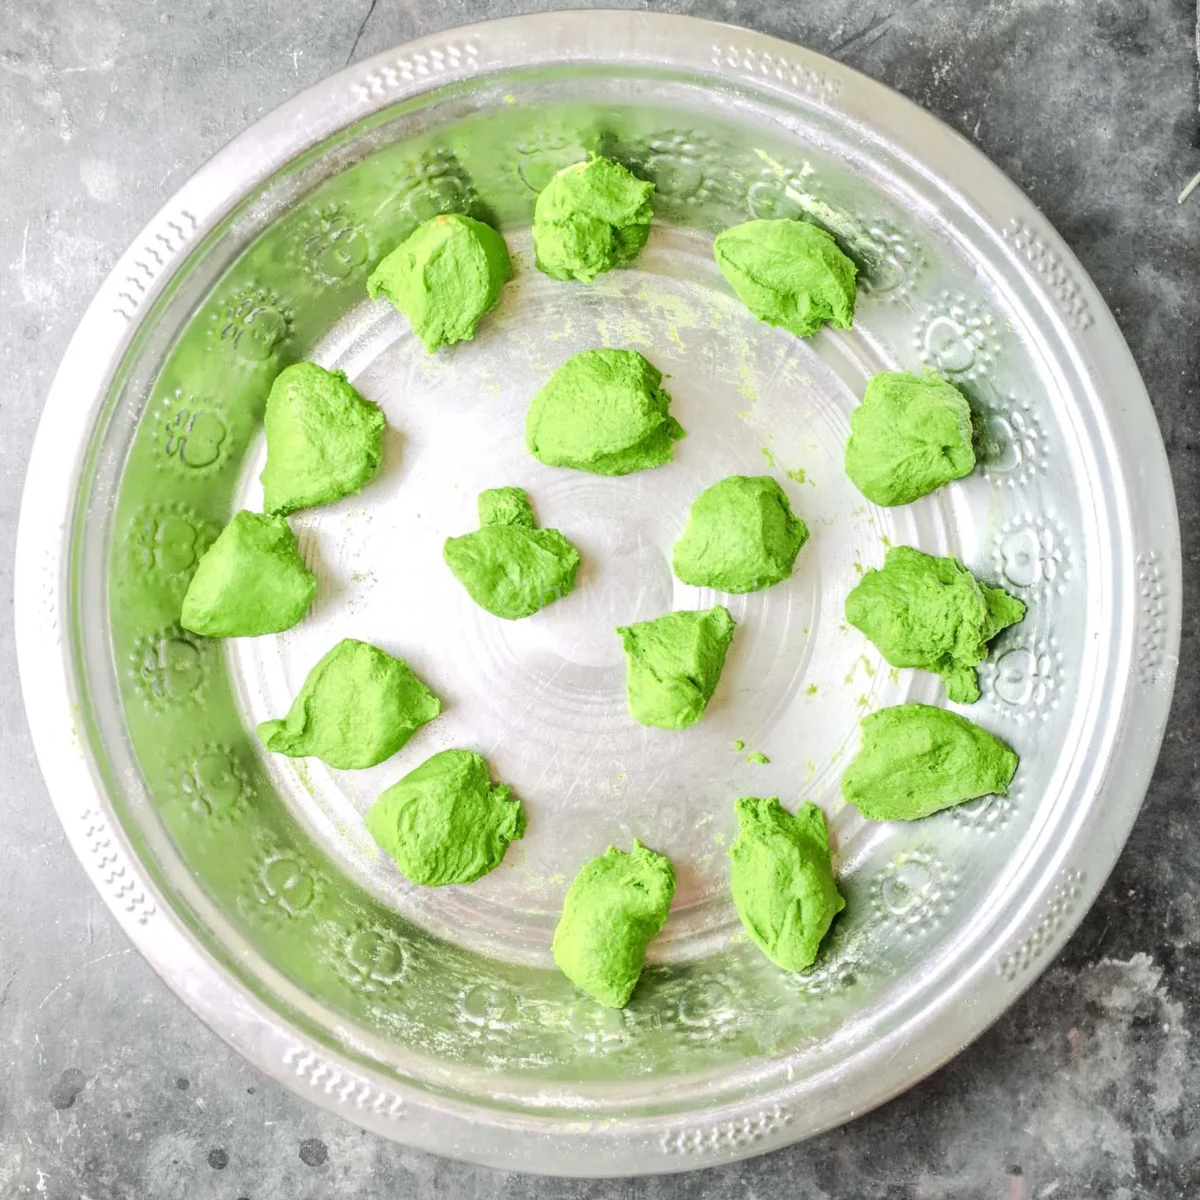
Nine: Separate the dough into 16 evenly-sized pieces. You can weigh each dough ball or eyeball it.
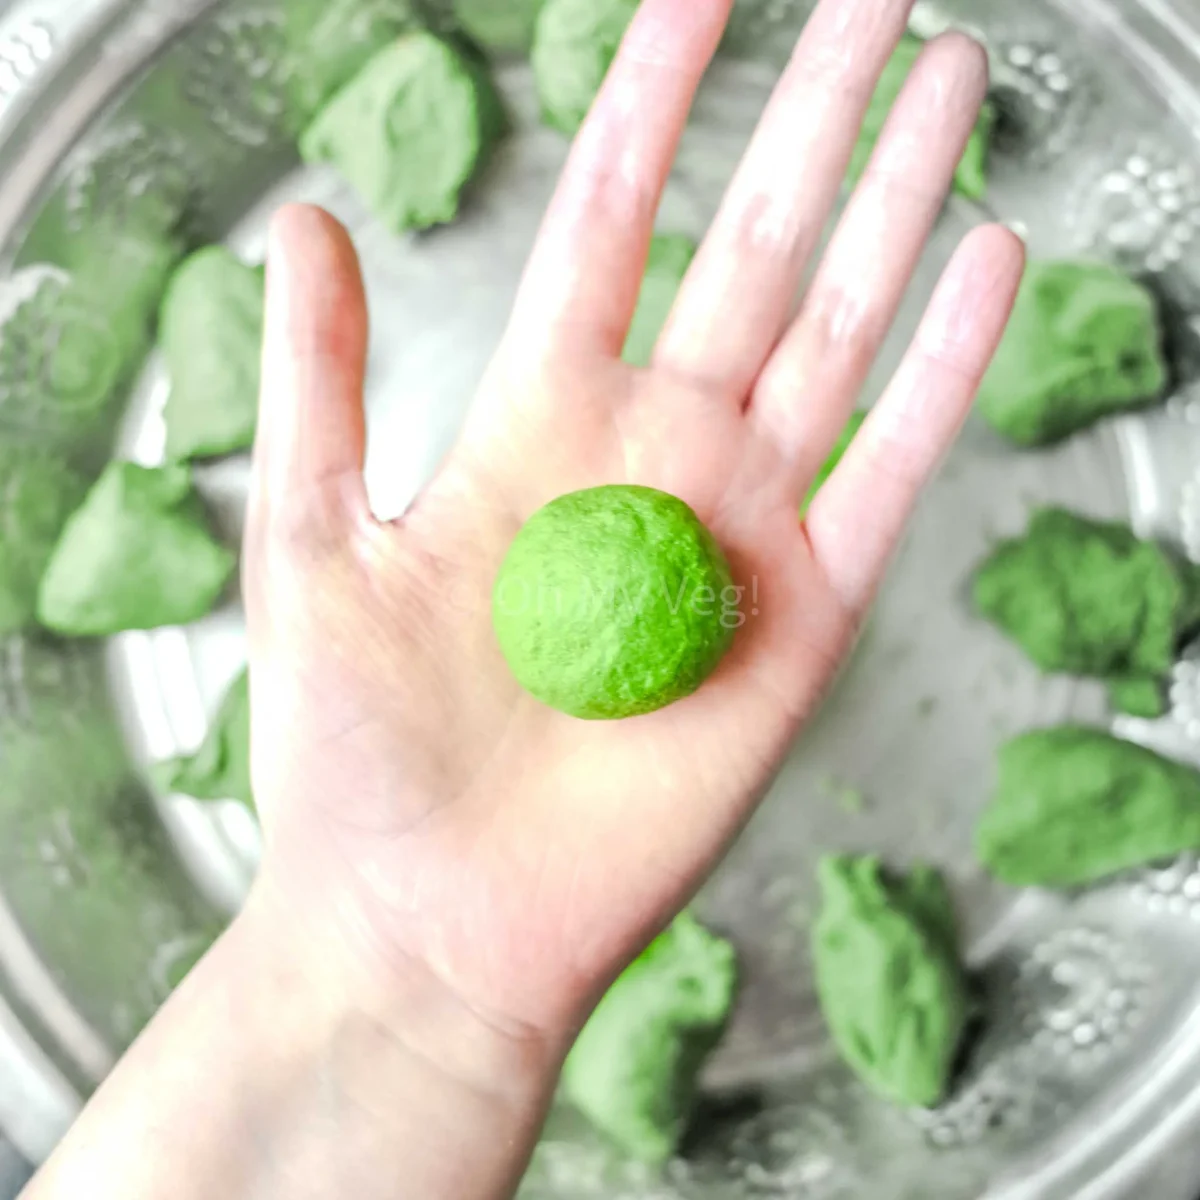
Ten: Roll each piece of dough between your hands to make a small ball.
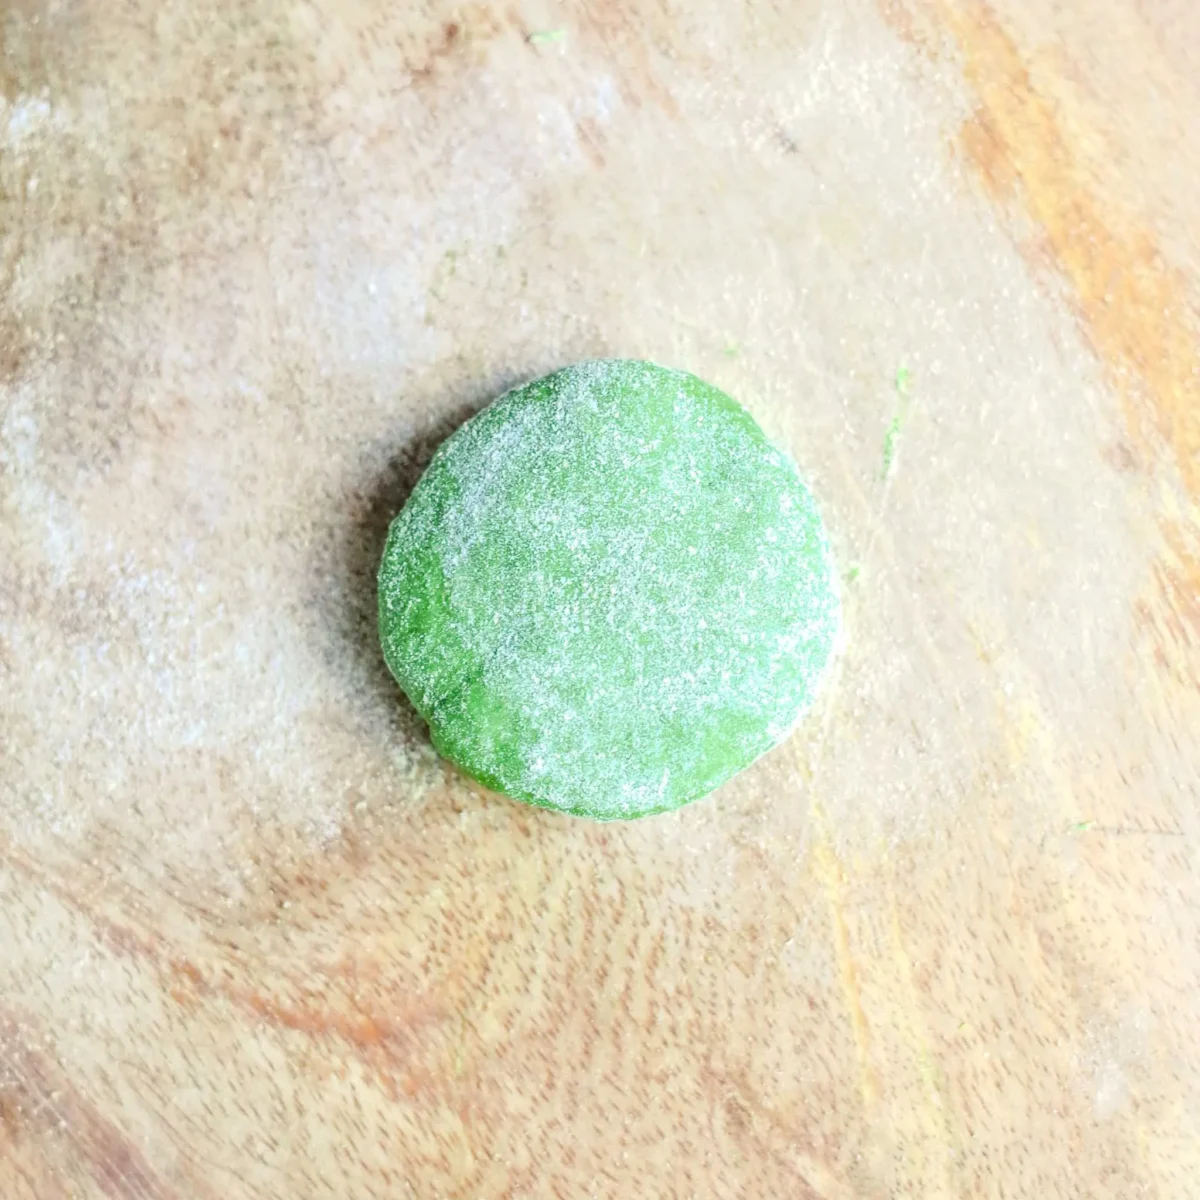
Eleven: Take a large rolling board. Dust a dough ball in flour, then flatten with the palm of your hand.
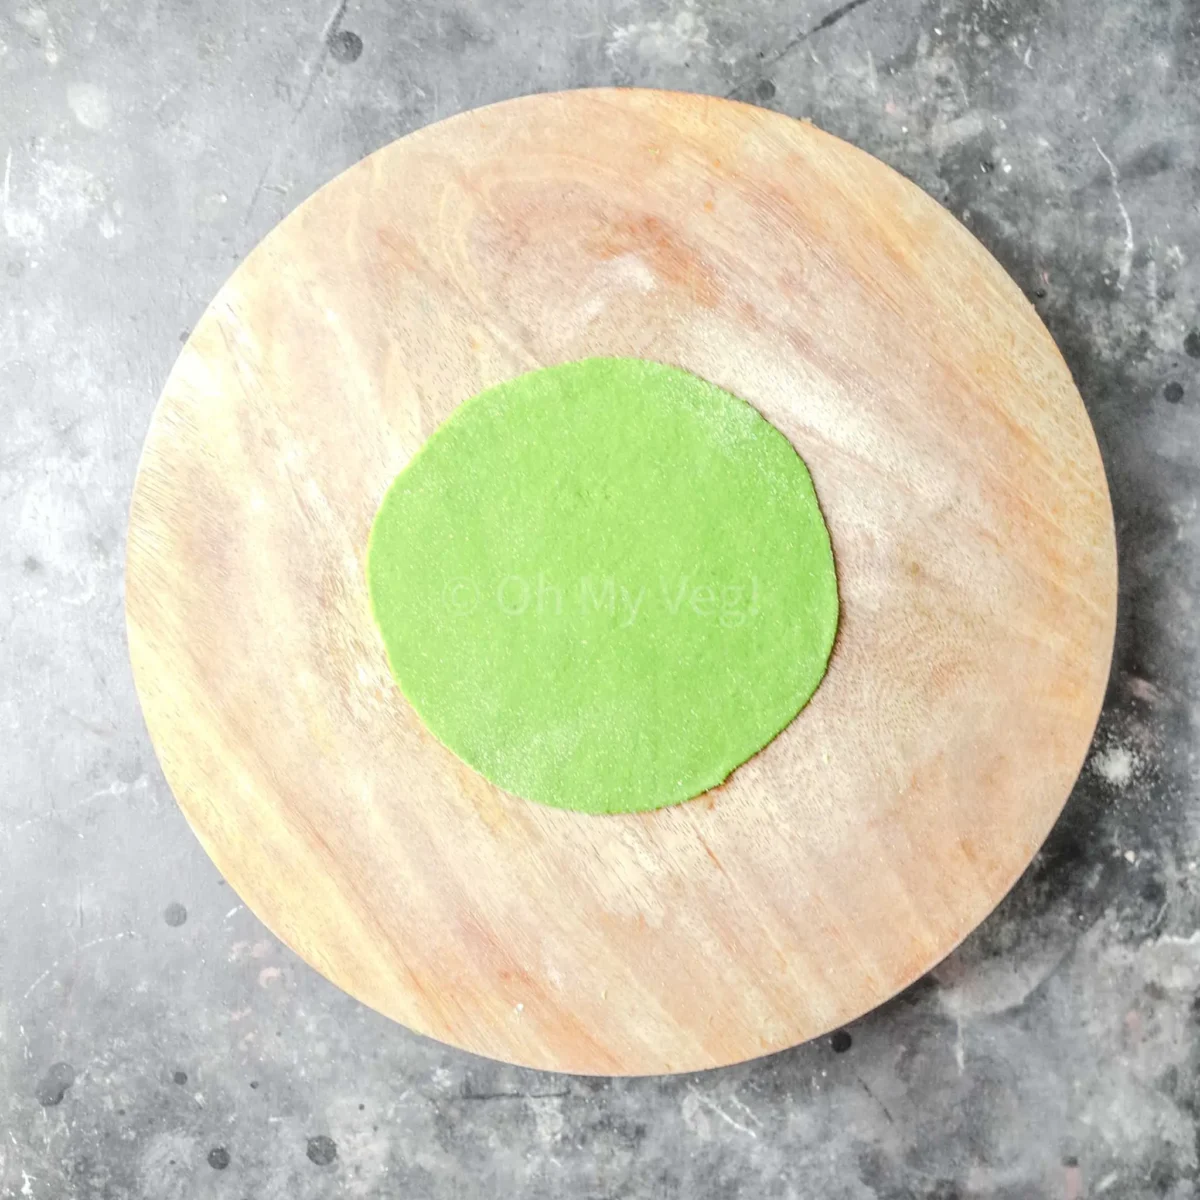
Twelve: Carefully, with even strokes and light pressure, roll your puri out to a 6-inch diameter. I use a tapered Indian rolling pin. Place on a flat surface and roll out the remaining balls.
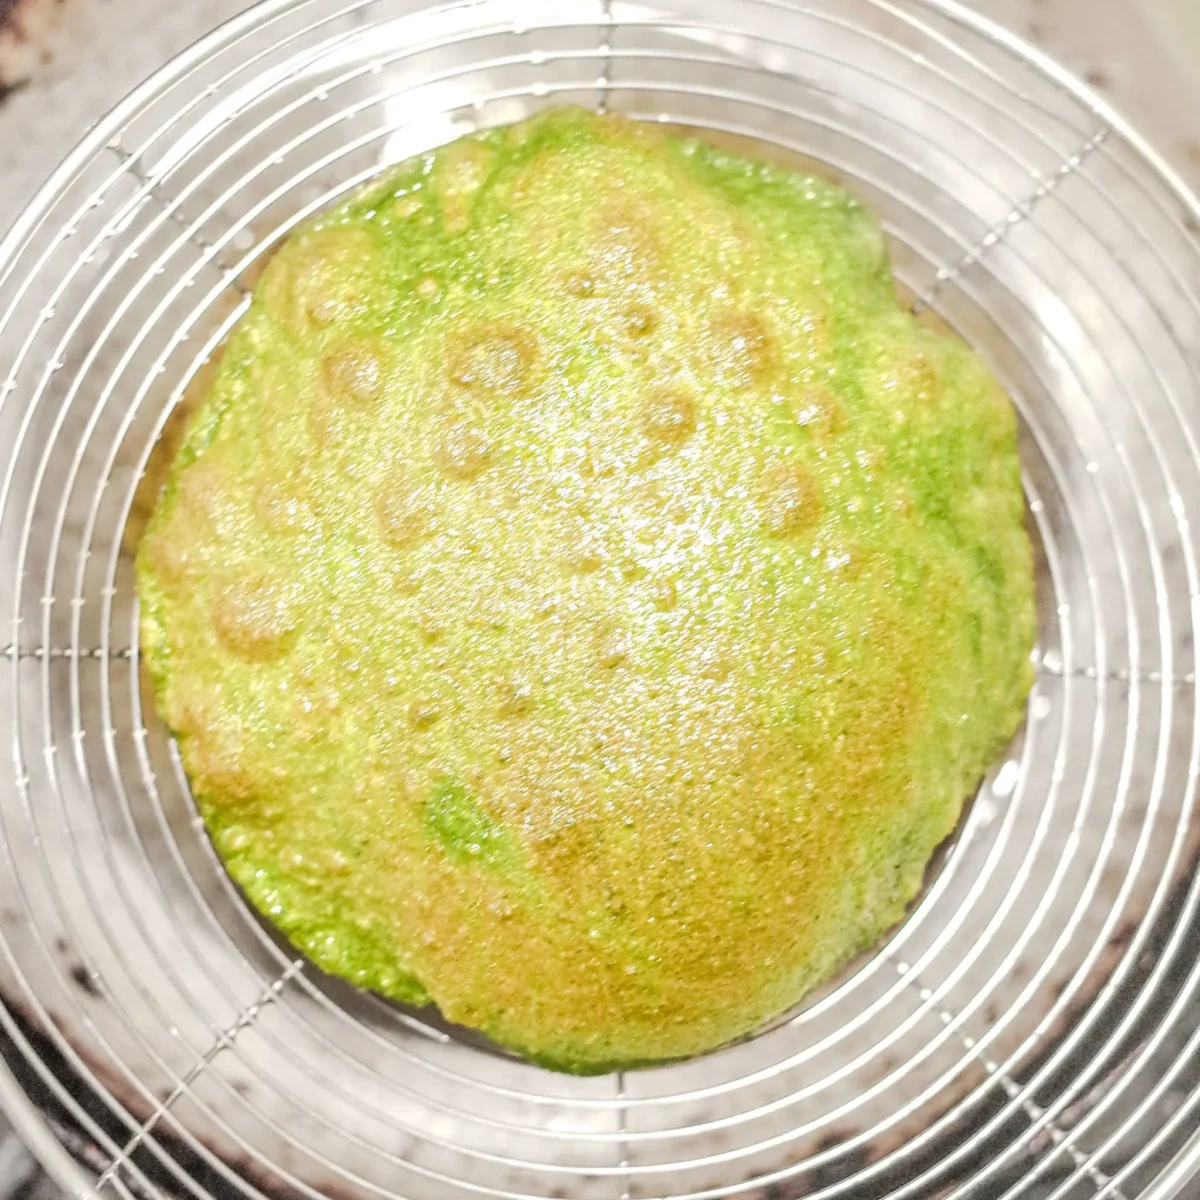
Thirteen: Heat a kadai or deep-fat fryer with 1 litre of neutral oil. Once the oil comes to temperature, add the rolled palak puri. Press the puri to encourage it to puff, then carefully turn. Fry the other side until it’s also lightly browned.
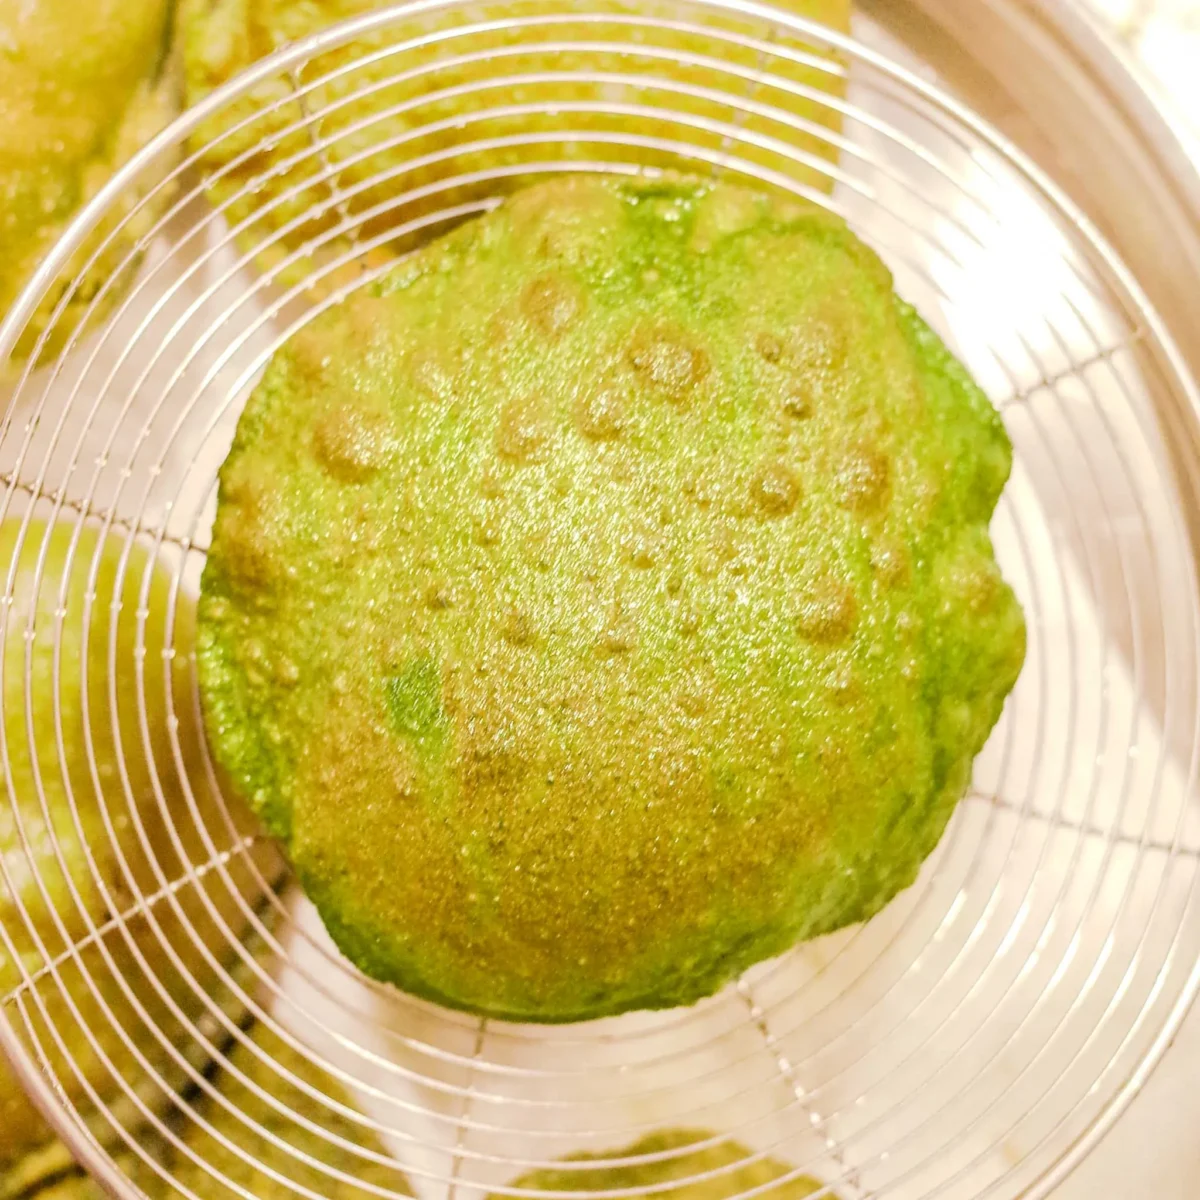
Fourteen: Once cooked, drain excess oil and place on a wire rack. Repeat the frying process with all the remaining palak puri.
Remember, the complete recipe (with ingredient quantities and instructions) can be found at the bottom of this page. You can also print or save the recipe, adjust the servings, and more from there!
🏆 My Expert Tips for Palak Puri that Puff
I’m not ashamed to admit that when I first started making puri, they were a bit of a mess.
After years of practice, I’ve learnt there are a few things you can’t compromise on. These make the difference between greasy puri that soak up oil and perfectly puffed, crisp palak puri.
- Always rest the dough. Yes, it’s added prep time. But it makes a big difference. Resting bread dough relaxes the gluten in the flour, making it softer and easier to roll out.
- Roll the puri evenly. An even thickness throughout the circle is key — without that, they simply won’t puff. This tip applies to chapati/roti, too.
- Heat your oil to the right temperature. If the oil is too cold, the palak puri will absorb it rather than puff. The result? Greasy puri. Too hot, and they’ll brown quickly and crisp up like papad (poppadom)! Find the perfect medium-high heat.
- Use a frying spoon to help things along. Sometimes, palak puri puff up of their own accord. Not always, though — in this case, I like to give them a little nudge in the right direction. Gently nudge and push the top of the puri with a slotted spoon to encourage a puff.
Of course, puris that don’t puff are still perfectly edible (delicious even!).
In fact, you should expect a few non-perfect ones — still scrumptious, trust me — it really is true that practice makes perfect.
Also, even the best puffed puri doesn’t remain puffed forever. A little time after frying, they’ll naturally deflate: this signals a beautifully soft bread and is nothing to worry about. If you want your palak puri to remain crispy, add a teaspoon of extra semolina to your dough and don’t stack them after frying.
🥡 Storing, Freezing, and Reheating
➡️ Fridge: Cooked palak puri can be stored in the fridge for up to two days. Arrange them in an airtight container with paper towels between to absorb excess moisture/oil.
➡️ Freezer: I don’t recommend freezing cooked palak puri. However, you can freeze uncooked dough balls or pre-rolled palak puri dough: coat the palak puri balls in oil, pop them into a freezer-safe bag (labelled with the recipe name and best-before date), and freeze for up to three months.
Alternatively, pre-roll your puris. Layer parchment paper between the puris to prevent sticking, and stack them tall. Pop into a freezer-safe container or bag. Freeze for up to three months.
Defrost for a few hours before using. Don’t re-freeze after defrosting.
➡️ Reheating: There’s technically no need to reheat palak puri — they taste delicious either at room temperature or even cold. Puris soften over time, which brings a new deliciousness to the table!
If you’d still like to reheat puri, bear in mind that while they will heat, they won’t regain their original puffiness. Still, you have a few options: reheat directly on a tawa, pop in the microwave, or give the puris a quick burst in the air fryer.
🫓 What to Serve with Palak Puri
You can serve fresh palak puri with any number of Indian recipes!
Having said that, my favourite pairing is with hearty potato curries: think aloo sukhi bhaji (mildly spiced potatoes), aloo rassa bhaji (fiery Maharashtrian thin gravy with potatoes), flower batata rassa (cauliflower and potato), or even aloo methi (stir-fried potatoes with fenugreek and spices).
And if you’re not in the mood to make bhatura or kulcha for chana masala (aromatic chickpea curry), palak puri is an excellent choice (and quicker, too!).
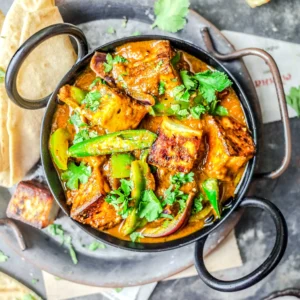
Not to forget, the crisp palak puri is a match made in heaven with paneer curries … it’s indulgence on indulgence — a must for those special weekend meals. I’m talking about paneer balti, Amritsari paneer bhurji, methi malai paneer, or malai kofta (best of both worlds: potatoes and paneer!)
For sides, try a cooling boondi raita and rustic tomato chutney.
If you’ve tried this palak puri recipe, please drop a comment ✍️ or a star rating 🌟 below to help fellow readers! Additionally, if you have a question, please drop a comment, and I’ll do my best to answer ASAP.

Palak Puri (That Puffs Every Time)
Ingredients
- 120 grams spinach washed and drained
- 1 green chilli I use jwala chillies
- 50 millilitres water
- 200 grams chakki atta stone-ground chapati flour
- 2 tablespoons fine semolina
- 1 pinch asafoetida (hing) optional
- ¼ teaspoon fine sea salt or to taste
- 1 ½ teaspoon neutral oil
- 1 litre neutral oil for deep frying
Instructions
- Add 120 grams spinach (washed), 1 green chilli (de-stemmed), and 50 millilitres water to a blender. Blend to a smooth, fine puree.
- Next, take a large parat or mixing bowl. Add 200 grams chakki atta , 2 tablespoons fine semolina, 1 pinch asafoetida (hing), and ¼ teaspoon fine sea salt. Mix well to combine.
- Pour the spinach puree into the mixing bowl. Slowly start to incorporate the dry ingredients into the wet. Bring it together to a shaggy dough.
- When the spinach puree is completely incorporated and the dough is green, start kneading. Push down on the dough with the heel of your hand. Turn, and repeat the motion. Knead for 2-5 minutes.
- Flatten the dough, and make indents with your fingers. Work 1 ½ teaspoon neutral oil into the dough.
- Roll the dough into a large ball, then separate into 16 small, evenly-sized pieces. If you'd prefer, you can also cover the dough and rest it for 30 minutes (or refrigerate overnight).
- Use your palms to evenly roll each of the pieces into small balls.
- Add 1 litre neutral oil to a large kadai or deep-fat fryer. Pre-heat to 185℃ (360℉). While the oil heats, roll out the puri.
- Work with one dough ball at a time. Grab a rolling board, dust the dough ball in flour (or oil, if you prefer), and flatten with your palm. Slowly roll the dough into a circle 6 inches in diameter, using slow movements with even pressure.
- Once rolled, keep the palak puri aside on a non-stick surface. Cover with a cloth to ensure they don't dry out, and don't overlap (they'll stick together). Repeat the rolling process with all the remaining dough.
- When your oil has come to temperature, carefully slide one puri into the hot oil. It should immediately rise and begin to bubble. To encourage the palak puri to puff, use a frying spoon or deep skimmer to gently push on the surface. Once the puri puffs, carefully turn to fry the other side. Remove when just slightly browned, and drain on a wire rack. Repeat the process.